Squarespace How To Show Different Social Links On Different Pages
Squarespace* has made countless updates in the past few years to improve usability, add new features, and make the overall design process as easy as possible. It’s been great to see them rolling out so many new features that not only improves the platform as a whole, but also makes our lives a little bit easier.
Unfortunately, there is still one feature that I’ve yet to see them start working on. The feature I’m referring to is the ability to add different social links to different sections or pages on your website. I ran into this issue a few years ago while creating a website for a restaurant chain that had multiple locations. Each location had it’s own page on the website with it’s own social media profiles. My client wanted to show the social media icons specific to each location. Seems like a simple ask until I realized Squarespace didn’t allow us to do this. I spent hours custom coding a solution for the client which ended up working great in the end, but wasted a lot of time. And of course if you don’t have the coding knowledge, this isn’t an option!
Squarespace Custom Social Icons Example
Here’s another example a lot of website owners can relate to. Let’s say you have a “Team” page on your website that lists out all of your team member’s names/titles/bios. You might want to add each person’s social links underneath their image and/or on their individual bio page.
With Squarespace, you can only have one set of social links. Typically your set of social links is for your business as a whole (your Facebook, Instagram, Twitter, LinkedIn, etc…). It’s not possible to create multiple sets of social links, or a set of social links for each individual team member. So our friends over at SQS Mods* hooked us up and created the “Custom Social Icons Everywhere” plugin. This plugin allows you to inject ANY Social Media icon (or any icon you want) into ANY block you want. Pretty cool!
Whether you are a Squarespace Designer or an individual who manages your own website, this plugin is super easy to use and will allow you to get the multiple social link functionality you’ve been looking for. This article will walk you through how to set this plugin up on your Squarespace website.
*This post contains affiliate links. I earn a small commission when you click on the links and make a purchase. This comes at no additional cost to you. Affiliate links are marked with an asterisk.
Squarespace Custom Social Icons Everywhere* Plugin
SQS Mods* had the idea of injecting social media icons into the new List Section layouts in Squarespace. They accomplished this task but then decided to take it a step further and create a plugin that allows you to inject ANY social media icon into ANY block that you want.
The cool part is, you really can use ANY icon — it doesn’t just need to be the popular platforms and it doesn’t need to be the default Squarespace style. You can create custom icons for Twitter, Facebook, Instagram, LinkedIn, YouTube, Instagram, Vimeo, TikTok, Reddit, MySpace, Amazon, Skype, Stripe, Yahoo, PayPal, you name it! If there is an icon available, you can use it!
The plugin will work with any of these content blocks:
All list and auto-layout sections
All images blocks (poster, collage, card, etc…)
All summary blocks
Regular text blocks
Main website navigation
Basically in every block where you can type something and create a link, you can use this plugin
These customizations are available:
Pick your own icons
Set your own size
Set your own spacing
And if you have the skills, add your own hover animations
Compatibility: The plugin only works with Squarespace 7.1 and requires a Business Plan or higher
How to Create Multiple Social Icons in Squarespace
Step 1 Purchase the Plugin
Purchase the Custom Social Icons Everywhere* plugin directly from SQS Mods.
Step 2 Copy & Paste the Code
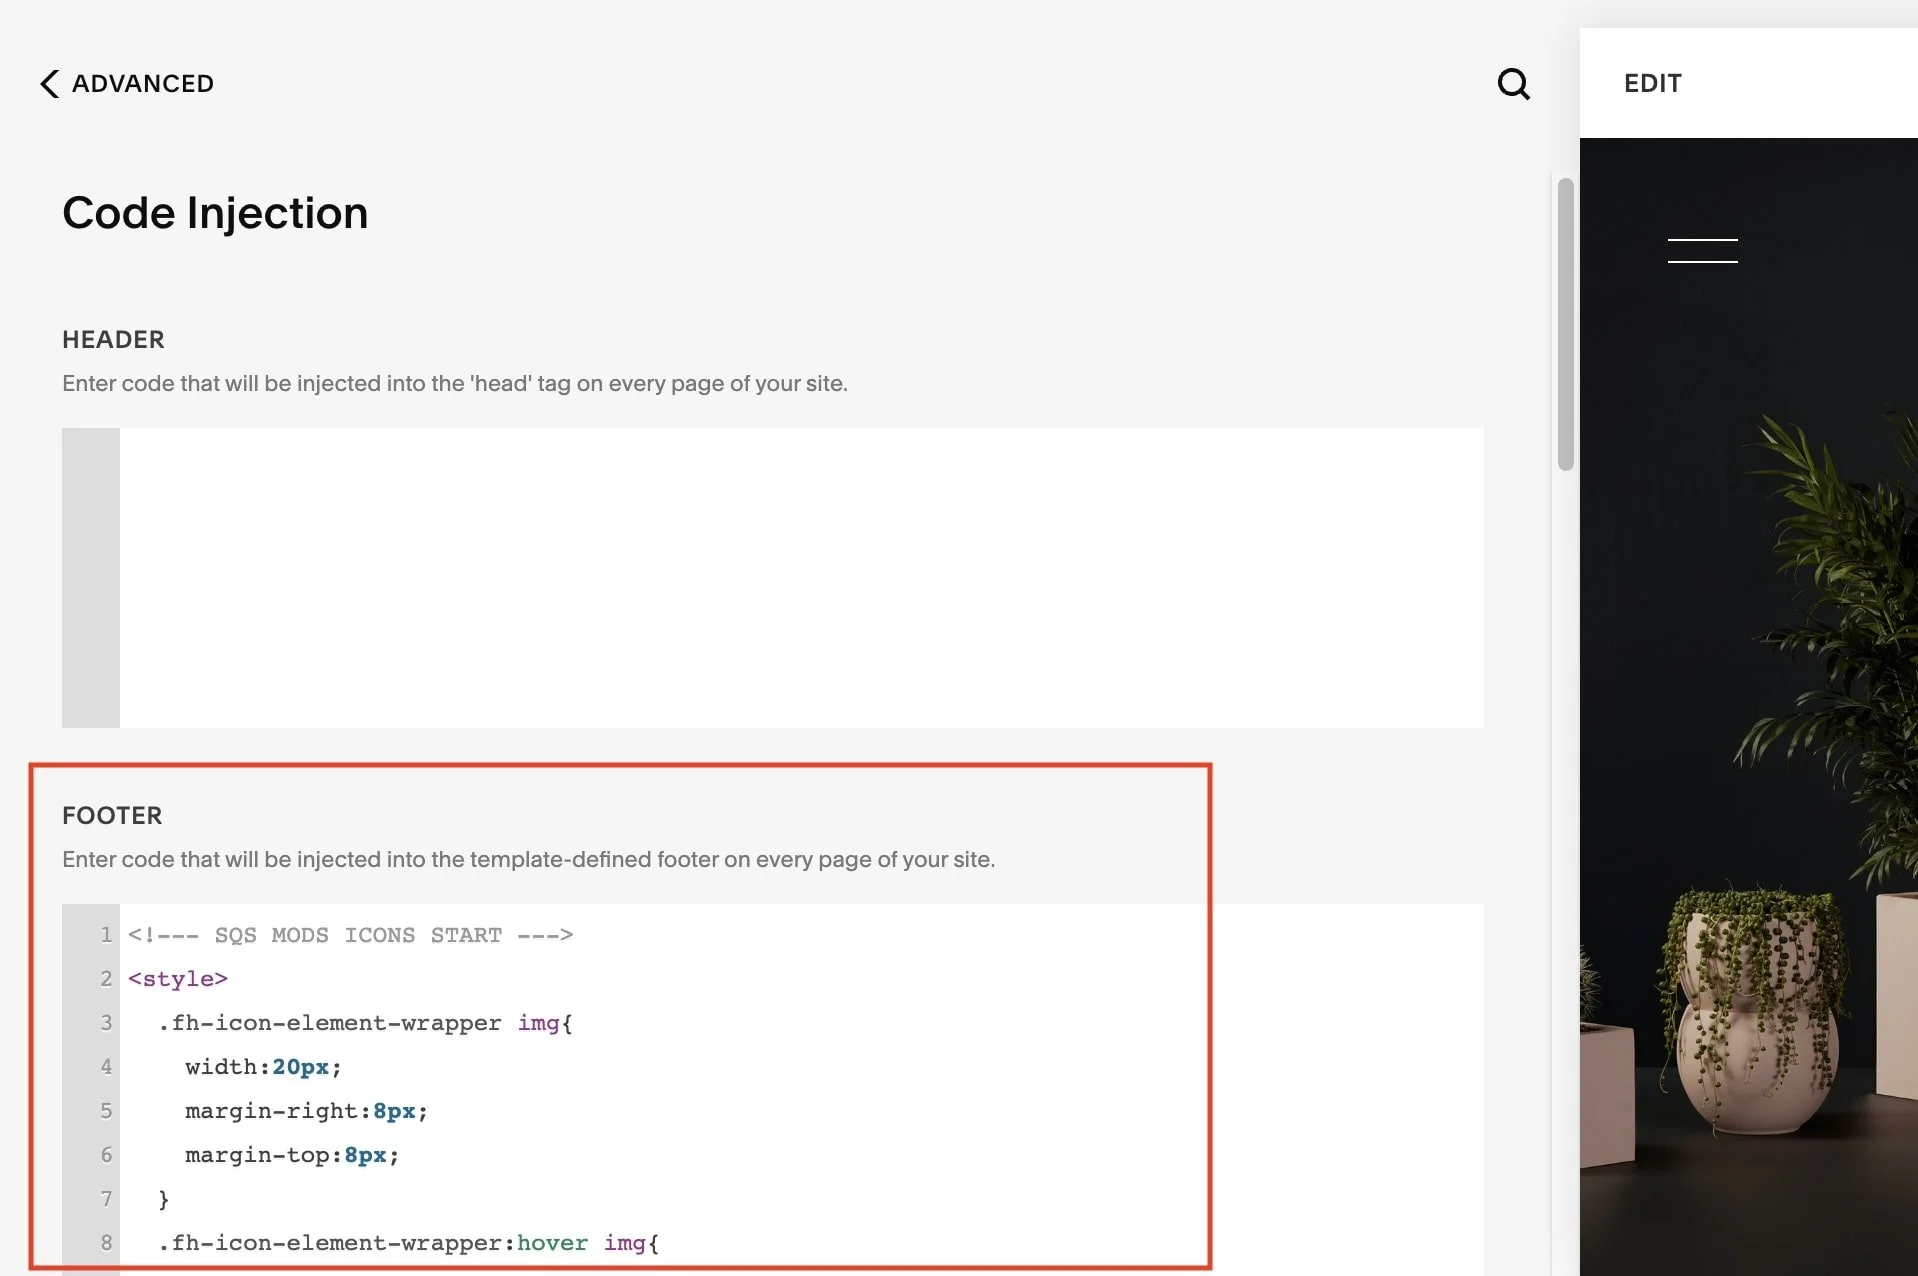
In your Squarespace website, navigate to Code Injection (Settings > Advanced > Code Injection). In the FOOTER field, paste the code that was provided to you when you purchased the plugin.
Step 3 Grab Your Social Icons
In order to use this plugin, you’ll need to grab some social icons from the web. I’ll use www.iconfinder.com or www.freepik.com to find free icons.
Download the icon or icons that you would like to use on your website. Save them in a folder where you can easily find them for the next step.
Step 4 Upload Icons to Website
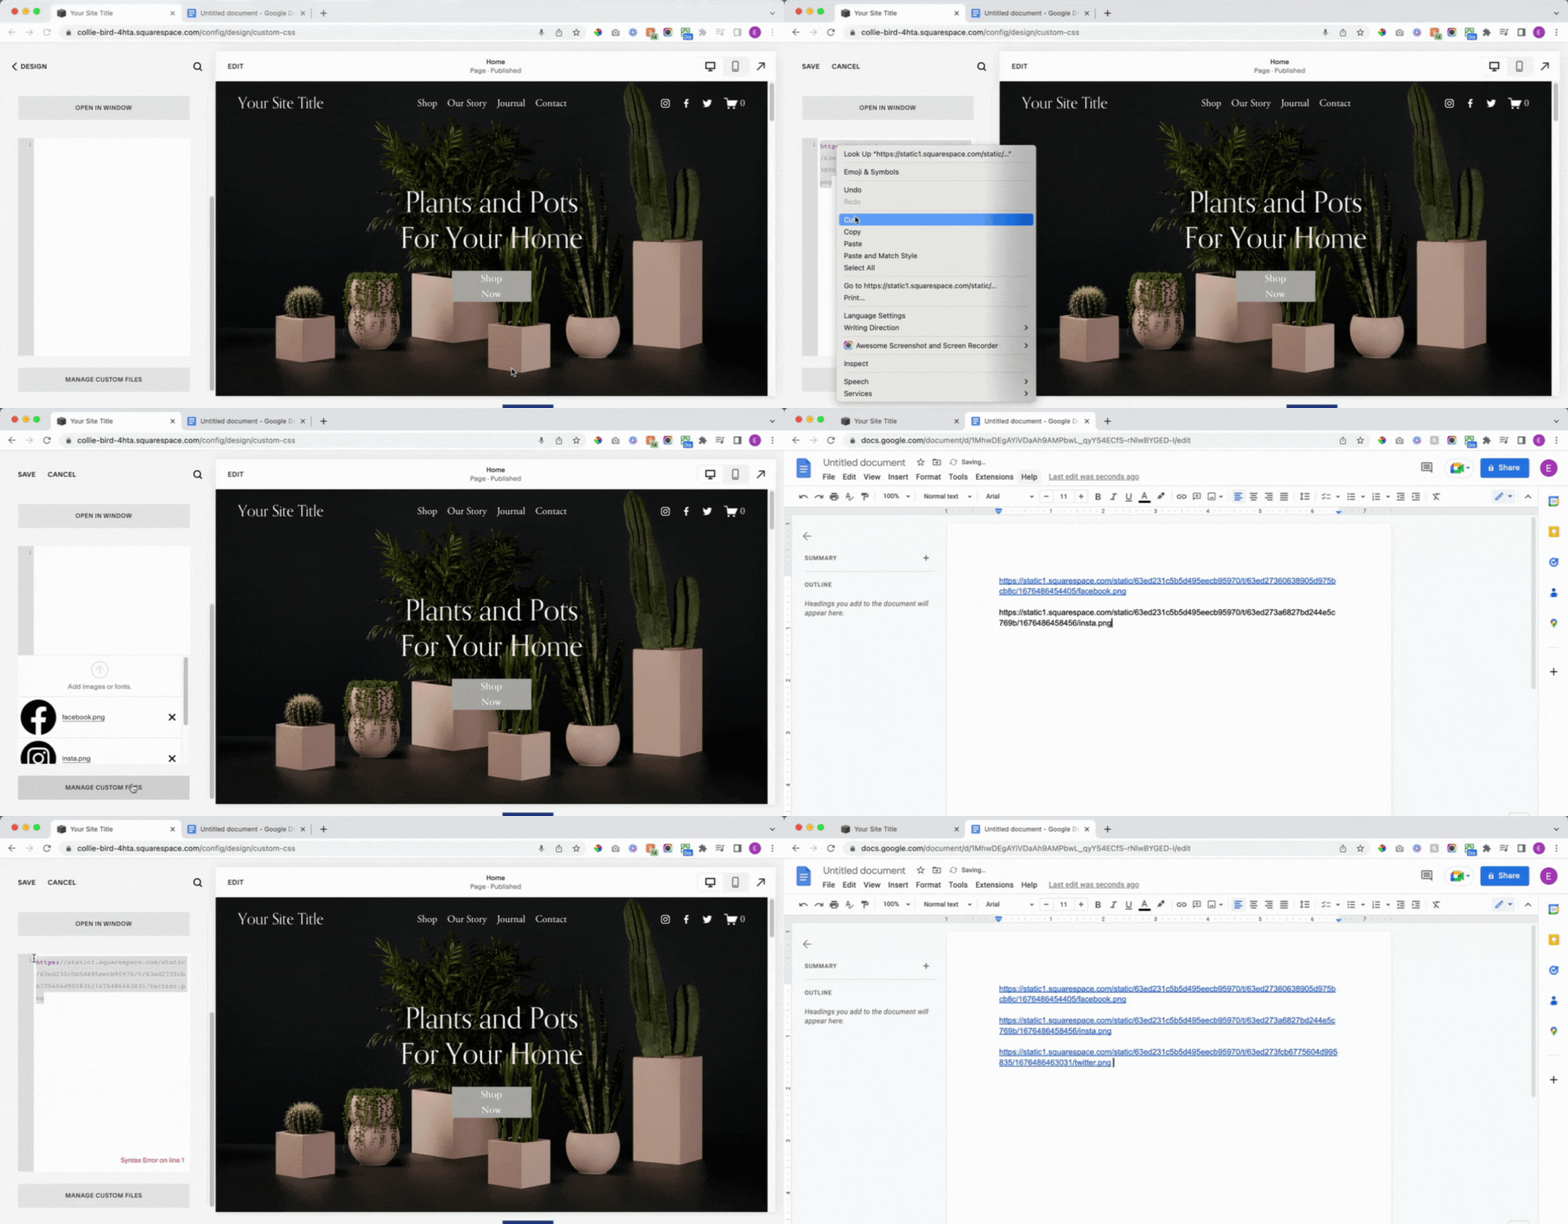
Next, we’ll need to add the icons we just downloaded to the website. In your Squarespace website, navigate to Custom CSS (Design > Custom CSS). Scroll down to the bottom of the Custom CSS panel until you find the MANAGE CUSTOM FILES button. This is where you’ll be uploading the icons.
Click on the MANAGE CUSTOM FILES button. Then, click Add images or fonts. Your computer’s file finder will then pop-up. When the file finder pop-up appears, find the icon or icons you saved to your computer in the previous step. If you are adding multiple icons, you’ll need to upload each icon individually.
Repeat this step until you have added all icons your would like to use to your website.
Step 5 Grab the Icon Links
Every time you upload a file to the Custom CSS, Squarespace will generate a link for that file. We want to grab the link for each icon we just uploaded.
To get the link, click on the icon. When you click on the icon, the URL for that icon will be pasted in the Custom CSS area above.
CUT the link (don’t copy) and save it in a Word doc, or any note-taking app you use. The reason we are cutting and not just copying is because we want to delete the link from the Custom CSS once we are done with it. If you save the link in the CSS, it will create an error.
Repeat this step until you have all icon URL’s saved in your notes.
NOTE: If you already have Custom CSS on your website, try to do this step above or below the existing Custom CSS to avoid messing it up.
Step 6 Paste Icon Links into Plugin Code
After we have all of our icon links, we’ll need to paste those links into the original plugin code we added to the website back in Step Two.
In your Squarespace website, navigate to Code Injection (Settings > Advanced > Code Injection).
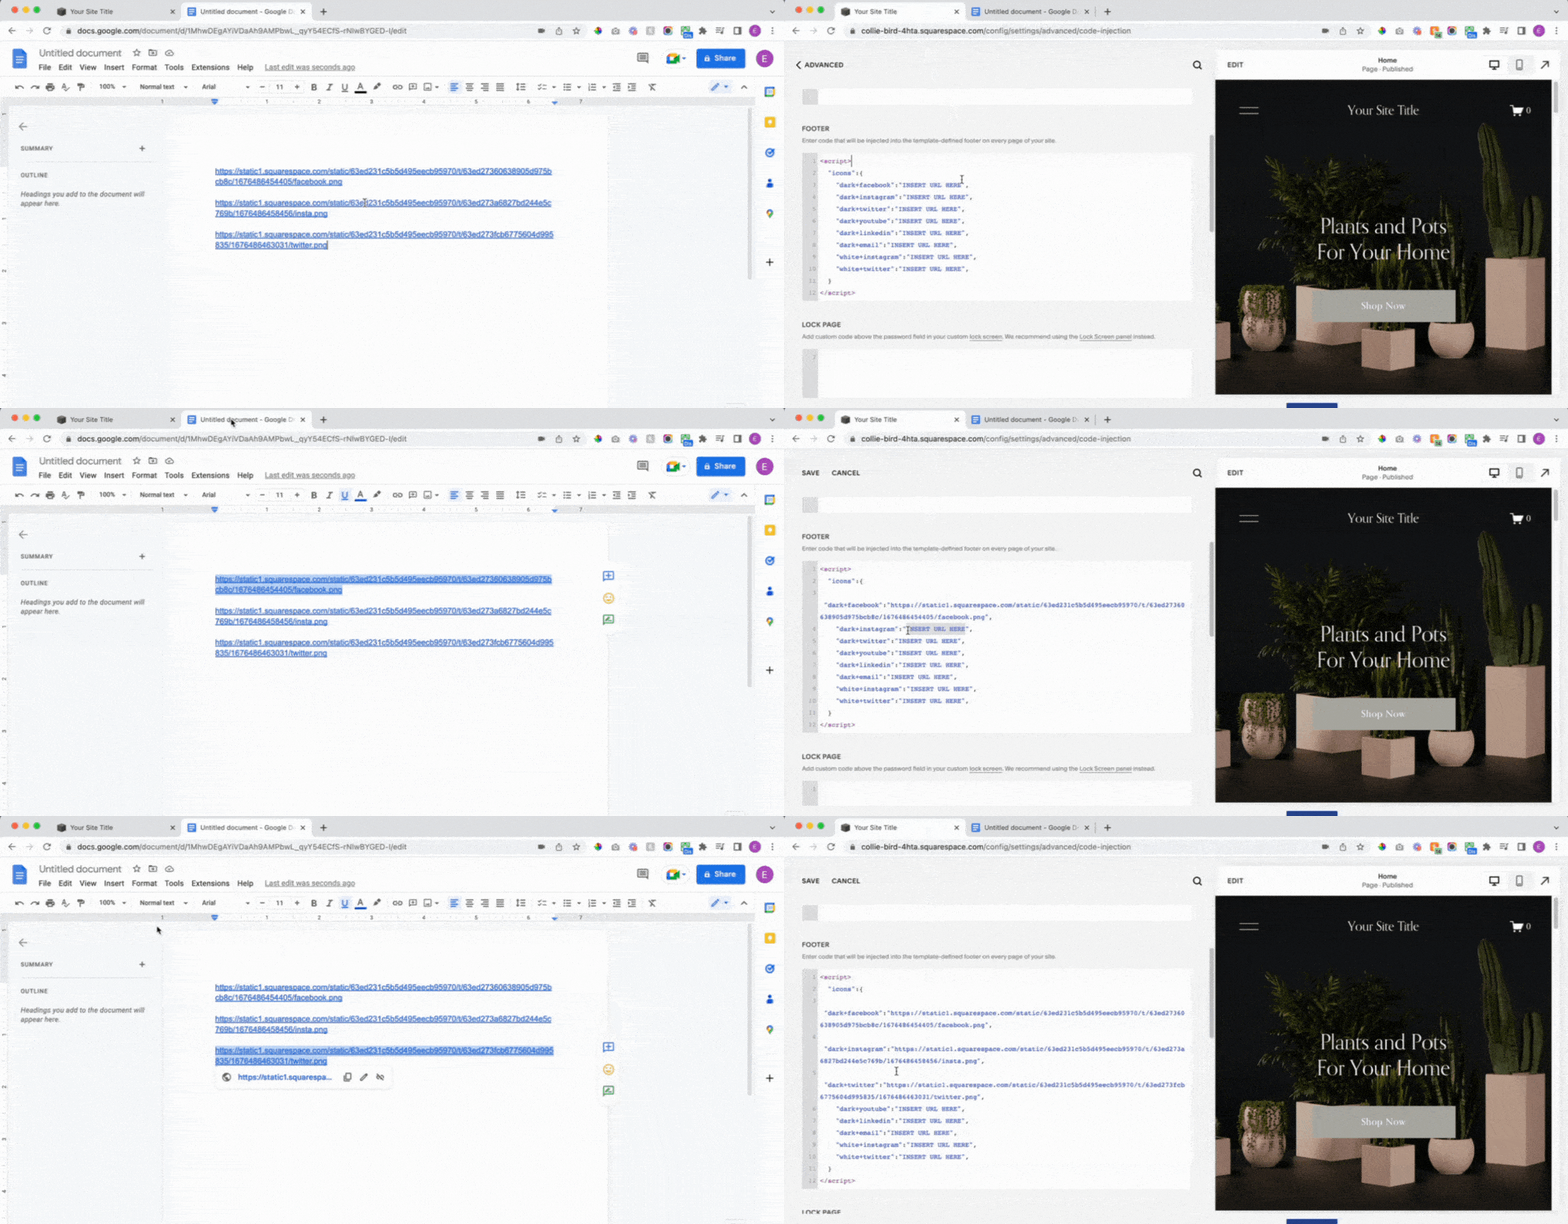
Within the plugin code, look for the code that repeatedly says “INSERT URL HERE”. This is where we are going to insert our icon links.
We want to replace the INSERT URL HERE with our icon links. Make sure to leave the quotation marks in place. Feel free to change the words dark+facebook, dark+twitter, etc.. although you don’t need to. If you do change these words, again make sure to leave the quotation marks in place and name it by color + name of link. For example: “red+tiktok”.
Your code is going to look something like this:
"icons":{
"dark+facebook":"https://static1.squarespace.com/static/63ed231c5b5d495eecb95970/t/63ed27360638905d975bcb8c/1676486454405/facebook.png",
"dark+twitter":"https://static1.squarespace.com/static/63ed231c5b5d495eecb95970/t/63ed273fcb6775604d995835/1676486463031/twitter.png",
"dark+instagram":"https://static1.squarespace.com/static/63ed231c5b5d495eecb95970/t/63ed273a6827bd244e5c769b/1676486458456/insta.png",
"dark+youtube":"INSERT URL HERE",
"dark+linkedin":"INSERT URL HERE",
"dark+email":"INSERT URL HERE",
"white+instagram":"INSERT URL HERE",
"white+twitter":"INSERT URL HERE",
}
I am not showing the entire plugin code injection in the image above, only the portion involved in this step.
Make sure to SAVE your changes!
Note: You do not need to use all of the “INSERT URL HERE”. It’s okay to only use the ones you need. On the other hand, you can add more “INSERT URL HERE” and links if needed.
Step 7 Add Links Where Icons will Appear
After you’ve edited the plugin code to include your icon links, we’ll just need to add specific text links wherever you want the social icons to appear on the website.
Navigate to the page where you would like to insert your social links and click EDIT on that page.
We are going to add text links for each instance of the social icon. In my example below, I am using simple text blocks in Fluid Engine. But you can use any element you’d like that allows for text links (image blocks, list sections, summary blocks, etc…).
To add the link, simply type the name of the link from the plugin code (dark+facebook, dark+instagram, dark+twitter, etc..). Then highlight the text and link it to a social profile. In my example below, I am simply using facebook.com, twitter.com, etc… but of course you will add the entire link for your social profile.
FINAL RESULT 🎉
We’re done! In the example below, you can see that each individual team member now has their own individual set of social media icons that links out to their corresponding social accounts.
How to Add Social Icons to Site Header in Squarespace
If you’d like to add these social icons to your website’s header, follow these instructions:
Click on the + sign next to Main Navigation in your website’s pages
Scroll down to the More section and click on Link
Under Link Title, type the name of the link from the plugin code (dark+facebook, dark+instagram, etc..)
Under Link, add your social link
Click Save
That’s it! Now your website should have the ability to add multiple social links to any section/any block/any page. Many thanks to SQS Mods* for creating this awesome plugin! Check out their online shop where they sell more amazing plugins (and even Squarespace Templates!)
Did you enjoy this article? Check out more articles like this in the Squarespace Blog. In the blog, I share tips for hiring Squarespace Designers (or becoming one!), custom CSS and Javascript solutions, latest Squarespace news and updates, my favorite plugins, Squarespace Template Shops, and more!
Browse Premium Squarespace Templates
My modern, service-based templates are designed for entrepreneurs and small businesses who are looking for a professional website design without breaking the bank. Each one of my templates include video tutorials for easy content upload / style tweaks. I also include my Advanced SEO Guide (a $500 value). This guide contains the exact techniques I use to help my SEO clients land on Google page 1.






![50+ Best Premium Squarespace Template Shops [2025]](https://images.squarespace-cdn.com/content/v1/5fac4b921ca05f08cb315e40/1735848204800-I3GDILCDSSJO3EM3BVAW/Premium+Squarespace+Templates%2C+Squarespace+Templates%2C+Squarespace+Templates+For+Sale%2C+Best+Squarespace+Templates%2C+Custom+Squarespace+Templates%2C+Squarespace+Premium+Templates%2C+Squarespace+Website+Templates%2C+Squarespace+Custom+Templates.jpg)
![15+ Best Squarespace Plugins [2025]](https://images.squarespace-cdn.com/content/v1/5fac4b921ca05f08cb315e40/1694728480567-VI2YDT6NUD3M24LSQI9Z/Squarespace+Plugins%2C+Best+Squarespace+Plugins%2C+Squarespace+Design+Plugins%2C+Best+Squarespace+7.1+Plugins%2C+Squarespace+Animation+Plugins%2C+Squarespace+Commerce+Plugins+%2B+Squarespace+Plugins+7.1%2C+Squarespace+Plugins+For+Ecommerce%2C+Squarespace+7.1+Plugins.jpg)
![Cost To Hire An Expert Squarespace Web Designer [2025]](https://images.squarespace-cdn.com/content/v1/5fac4b921ca05f08cb315e40/1676998633226-ZZZ9ELM4Z5HOSV0F3RWI/Squarespace+Web+Designer+Pricing%2C+Squarespace+Designer+Pricing%2C+Squarespace+Web+Designer+Cost%2C+Squarespace+Designer+Cost%2C+Squarespace+Website+Designer+Cost%2C+How+Much+Do+Squarespace+Designers+Charge%2C+Squarespace+Website+Designer.jpeg)
