How To Design A Website On Squarespace
New to Squarespace and looking to get your site up and running, like yesterday? No worries! Squarespace is very intuitive, user-friendly and doesn’t have nearly as steep of a learning curve as other building platforms. Squarespace has a drag-and-drop interface. Meaning, when you’re building your actual website pages, all you need to do is drag and drop content blocks to make up the layout of your page. With Squarespace, there’s no plugins to worry about, basic SEO features are already built-in, SSL for site security is included, etc… making Squarespace a great choice for anyone looking to build a beautiful website and easily maintain it. This article will walk you through each step required to build your new Squarespace website, from start to finish.
How do I use Squarespace to create a website?
1. Pick a Template
As a designer, I always use the Brine template, (view Brine demo here) as it’s the most flexible and has the most design features & settings compared to any other template. The Brine template (and a lot of other Squarespace templates) utilizes Index Pages. Index Pages allow you to create multiple sections with a single scrolling page.
2. Start a Free Trial
Squarespace gives you a 14-day free trial with any new website. This gives you some time to actually design and build your website, before committing to a subscription. Once you’ve chosen your template, click on the option to ‘Start with this design’. Or begin your free Squarespace trial here (USE CODE PARTNER10 FOR 10% OFF). You’ll need to create a free account using your name, email address and password. Then, you’ll be taken to your new website that looks exactly like the template demo you chose. You’ll receive a built-in domain name for your website which you can customize if you’d like. Later on we’ll talk about purchasing your custom domain name.
3. Set Up Your Pages & Navigation
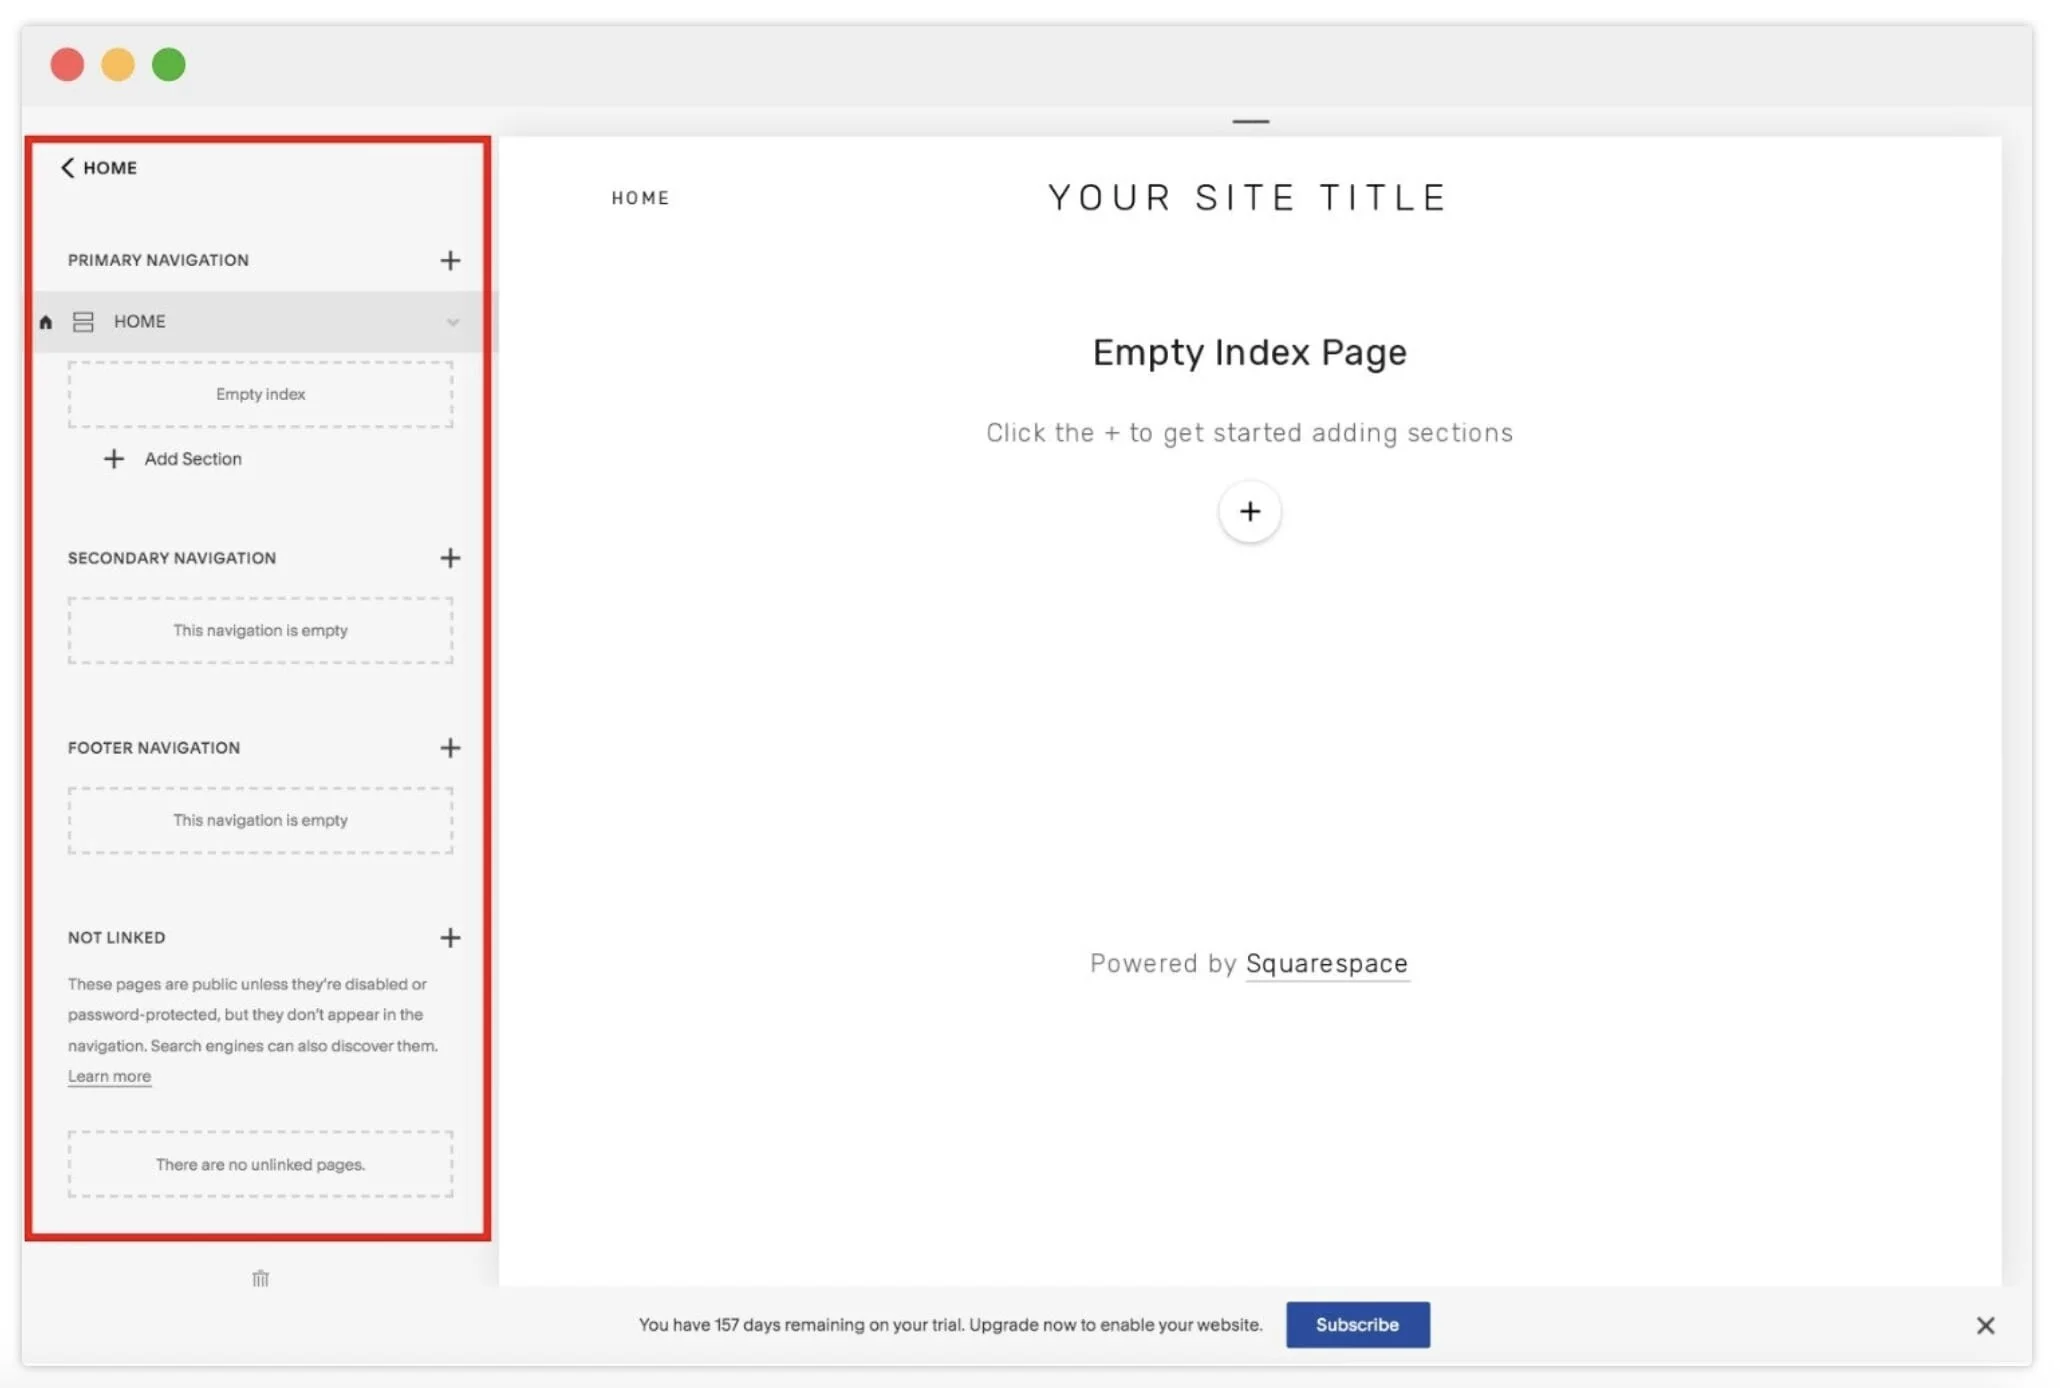
The first thing I’ll typically do when designing a new Squarespace website is I’ll go in and delete all of the pages that came with the template. You can certainly keep these pages and build off of them, but I choose to start with a clean slate. Once I delete all of the pages, I’ll create a new Index page for each website page that I’ll need (Home, About, Services, Blog, Contact, etc…). This allows me to set up my website navigation and get all of my pages in place so that I can begin designing.
4. Add Your Logo
To add your logo to your website (or site title), go into Design > Logo & Title. Here you can upload your logo and favicon (the tiny icon you see in the browser tab). If you don’t have a logo, you can add your Site Title instead. Even if you do have a logo, add a Site Title! This text is indexed by search engines.
5. Basic SEO Setup
Squarespace comes with a ton of built-in SEO options. What I’ll do before the design process is add my site-wide meta description and my individual page descriptions. However, these elements are really just the tip of the iceberg for SEO. To learn more about my full SEO process and checklist, visit my Squarespace SEO page. My full process includes keyword research, adding image metadata, optimizing URL slugs, submitting my sitemap to Google, etc..
6. Site Styles
After I’ve set up my site’s navigation, created all of my pages, set up my SEO, etc… I’ll go into the Site Styles section (under Design). I’ll choose my fonts, colors, button styles, etc… Sometimes I’ll create a dummy page where I’ll add every type of content block I might be interested in using throughout the site and then I’ll style everything on the dummy page in the Site Styles. This sets me up for success moving forward as I’ll spend less time designing and more time actually building the site around my content.
7. Custom CSS
Since I’m a developer, I go a step further than just the Site Styles. I’ll go into the site’s Custom CSS and write CSS for certain content blocks, sections, pages, etc… I’ll do this before and during the actual website build. Note that Custom CSS is not required to design a website on Squarespace. This is simply a luxury that I offer as a professional Squarespace designer, to further personalize my client’s websites.
8. Optimize Images
Before the website build, I’ll gather all images that I’ll be using on my site into one folder on my desktop. I’ll rename each image image file with my target keywords (based on my SEO keyword research). I’ll also resize each image file to be 500KB or less. This is important for website speed and SEO. Typically large background images should be no larger than 2500 pixels wide, and all other site images should be no larger than 1500 pixels wide. If you’ve resized your images and they’re still not below 500KB, you can use an image compression software such as JPEGmini. Note that JPG images are usually always smaller than PNG, so convert your PNGs and JPGs, to further reduce file size.
9. Start Building Your Website Pages
Okay, so after I’ve optimized my images, I’ll start building the actual website. I always begin with the homepage. Since the homepage is typically a summary of the rest of the website, this is a great place to start. It allows you to visualize the rest of the site and get your site flow in place. For the homepage, I’ll typically create sections that tease the other website pages and then link to those pages. For example, I’ll have a section that quickly highlights the services that I offer, and then I’ll add a button that links to my “Services” page. Then, I’ll have a section that sums up my client and their experience in their industry, and then I’ll add a button that links to the “About” page.
It’s always a good idea to provide your website visitors with “Call-To-Actions” often and where appropriate because you want people clicking around your site and not just stopping on the homepage. This method of building the homepage really allows me to visualize the site as a whole and create a smooth user experience. Throughout building the homepage, I may go back into the Site Styles/ Custom CSS and tweak if necessary.
10. Design & Build All Website Pages
After the homepage, I’ll begin building out the rest of my website pages. Since I pretty much put all design styles in place while creating the homepage, the remainder of the website build mostly involves just creating content blocks, adding my content and rearranging the blocks how I’d like them to appear on the page. A great tip and shortcut to be aware of when building your website pages is that you can duplicate sections and pages. So if there’s a section you created that you really like on your Services page that you’d like to recreate on your About page, you can just duplicate it and edit content if necessary.
11. Test Your Website On All Devices
Squarespace is very mobile friendly by default, so typically your website will already look great on all devices. But for the websites I build for my clients, I’ll typically add custom CSS here and there to really perfect things. And then I’ll test the site on desktop, laptop, tablet and phone.
12. Choose a Subscription Plan
Now that your website fully designed and built, it’s time to launch it! Start by selecting a subscription plan based on your needs. You can do so in Settings > Billing & Account > Billing > Upgrade OR by clicking on the blue “Subscribe” button at the bottom of your site in the Squarespace dashboard.
13. Connect or Purchase Your Domain Name
After you’ve chosen a subscription, purchase your domain name (or connect your domain name purchased through a third-party, example: GoDaddy). You can do this under Settings > Domains.
14. Make Your Site Live!
Now that you’ve connected a domain name and purchased a subscription, you can make your new website live to the public. You’ll do this under Settings > Site Availability > Public.
And that’s it! Congrats on designing and launching your new Squarespace website! If you have questions about your new website or get stuck on anything, Squarespace has a great support team, and a live chat where you can gets questions answered very quickly. Also feel free to drop a comment below!
Looking to hire a Professional Squarespace Designer?
Feel free to browse my portfolio full of recent projects, check out my Squarespace Web Design + SEO Package or ask me a question!


